Easy Tips for IMAP Migration from Gmail to Office 365 Account

Gmail is a rich web-based email application that fulfills the demands of organizations of many sizes and many individuals. But understanding the stability of Office 365 for enterprise-level uses, number of organizations starts moving over to it. However, if you are looking forward to perform mailbox migration and its related data from G Suite or Gmail to Office 365, then follow the steps:
Step 1. Domain Verification
At first, it is important to verify to Office 365 that you own a domain you used for Gmail account. But, if in case if you are utilizing Office 365 subscription is spite of using the own custom domain, just add users after they gets created in Office 365.
Step 2. Create Users and add them to Office 365
Before creating users, an appropriate license is needed. A mailbox should be assigned to each user to speed up the process of email migration.
Go to Admin center >> click Users appearing on the right panel >> select Active Users >> click More >> select the option of Import Multiple Users.

For the entry of Single User, click Add a user available on the above screen and manually enter the values. With the help of “Import Multiple Users”, download a sample of excel sheet and use it as reference to add users.
Some of the essential fields of CSV file contains Username, First Name, Last Name, Display Name, Age, Mobile Number etc.
The column of “User Name” should include email address. For example, abc@example.com
After listing the excel sheet with surnames, click Browse from Create and Upload File Screen. After this, click Verify, and once you receive confirmation message “File looks good”, click “Next”.

Step 3. Create Gmail mailboxes list to Migrate
First, generate an excel file that contains the collected mailboxes list that needs to be migrated to Office 365. During creation of migration file, it is important to know the password of each Gmail mailbox you need to move. Temporary passwords can be assigned to mailboxes during migration. You must be administrator of G Suite to reset passwords. Mailboxes can be migrated in batch as per user’s convenience.
Step 1. Go to G Suite admin console, sign it by entering the desired administrator username and password login details.
Step 2. Select Users.
Step 3. From Google Admin Center select users list.
Step 4. Select each user to recognize email address of every user. Note down the address.
Step 5. Go to Office 365 admin center and sign-in with required login details. Navigate to Users and select Active users.
Step 6. Open Excel, enter credentials like username, password and email address for each mailbox you want to move. Insert one mailbox per row.

Step 7. Save the same with CSV format.
Step 4. Use Gmail IMAP to Generate Migration Endpoints
To execute the migration of Gmail to Office 365, an easy communication way is built with Gmail. To perform this, Office 365 make use of migration endpoint. It is a terminology that encompasses the settings executed for establishment of connection to facilitate smooth mailboxes migration. Follow the steps to generate migration endpoint.
Step 1. Start Exchange Admin Center.
Step 2. Go to Recipients, hit Migration and click (…) and select Migration endpoints.

Step 3. Press New +.
Step 4. Select IMAP from a new page.
Step 5. On configuration page of IMAP migration, enter the details like:
IMAP server : imap.gmail.com
Settings: default
Tap Next. The migration service make use of settings to create connection to Gmail system. If connection is working, then the page of ‘Enter general information page’ will be opened.
Step 6. Enter name of Migration endpoint in Enter general information page, e.g. Testcase-endpoint.
No need to enter anything in other two boxes, leave them empty and click New.
Step 5. Create Migration Batch to Migrate Mailboxes
To migrate mailboxes from Gmail to Office 365, a migration batch with Gmail mailboxes needs to be created:
Step 1. Go to Admin Center of Office 365 and select Exchange.

Step 2. Navigate to Recipients from Exchange Admin Center and click Migration.
Step 3. Hit New (+) showing “Migrate to Exchange Online”.

Step 4. Choose IMAP Migration and click Next.
Step 5. Screen of ‘Select the users’ will appear, click Browse and choose earlier generated CSV file for migration and click Next.
Step 6. When validation process completes, Office 365 will show Gmail mailboxes, click Next.
Step 7. On the screen of ‘Set the migration endpoint’, choose migration endpoint the one which is created in earlier step. Click Next.
Step 8. On the configuration window of IMAP migration, continue with default values and tap Next.
Step 9. On the page of Move configuration, enter the name without spaces or any special characters of migration batch in the box – for e.g. Check1234-migration. Also, provide name of folders which needs to be excluded. Click Add icon (+) to add them to executed list.
Step 10. On the page of Start the batch, provide desired option and start migration.
Step 6. Update DNS Records for direct migration to Office 365
Email systems use DNS record which is represented as MX record to search for the particular address to deliver email. During the process of email migration, the MX record pointing to Gmail system. It is time to point MX record to Office 365. After changing MX record, email will be sent to Gmail account which is then delivered to Office 365 mailboxes.
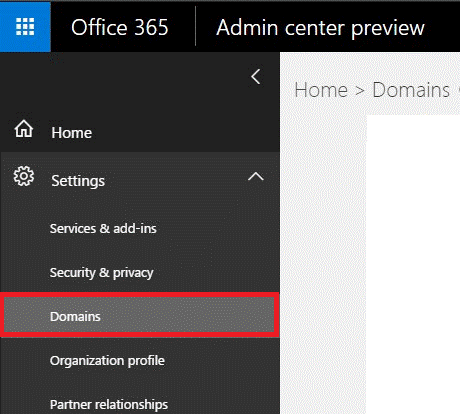
Step 1. Go to Office 365 Admin Center, from left panel click Settings.
Step 2. Select Domains, choose domain name. It will generally display as “Setup in progress”.
Step 3. Another notification will appear of “Setup completed”
For e.g. if your domain is example.com

Click example.com which is default, this will show message on screen “Setup your online services” with two options:
Add records for me – The option will generate connection with DNS domain and automatically update MX record.
I’ll manage my own DNS records – The option will give flexibility to insert DNS entries list which are the values of MX record that follows the process of manual addition from domain registrar.
Select 2nd option that requires to add MX records on DNS. For each domain, value of MX record will be different.
Migrate Gmail Mailbox to Office 365 Account
If you are searching a way to migrate emails from Gmail to Office 365, in that case you require third party automated utilities like All-Mail Backup Tool. In seconds, the software performs batch mailbox migration IMAP to Office 365. Get the highlight of some main features the application possesses:
- Option to batch migrate mailboxes without data loss.
- Maintains accuracy and dataset security throughout the process.
- Performs migration of Gmail data to both hosted and on-premises Exchange deployments.
- Offers different advance filters options for executing selective process.
- Keeps attached files in original format during migration process from cloud to cloud or individual file formats.
Last Words:
Implementing the process manually of Gmail to Office 365 is prone to error and also consume lot of time during migration. It is recommended to try third party utilities that are cost-effective and easily operated by all kind of users in moving Google data to Office 365.
