CubexSoft All-Mail Backup : Know How it Works!
Follow this step-by-step guide for CubexSoft All-Mail Backup Software.
And Download/Backup/Archive/save/ Emails from Various WebMail Accounts.
Launch CubexSoft Email Backup Software to backup and archive emails of 90+ webmail apps to popular formats and cloud-based services.


Besides getting option to enter your single email account, the software also provides you with the option to add multiple email accounts at once using its Use Batch Mode Option.

Click on Add CSV button to load CSV file containing login credentials of all the email source accounts from which you want to backup your email data.
Note : Click here to know how to create CSV file

Now select the CSV file and click on open button

The listed email accounts list will appear alongwith their respective passwords.

Choose the required email accounts by checking their respective checkboxes. Or you can select all of them at once using Select All option. Then click on Next button


Once the login is successful, software will start loading all the folders, sub-folders in the Folder List.
The software loads and shows the exact structure of folders, labels of the account with accurate message count, alongwith their respective checkboxes.
The Email Backup software provides selective folder option to backup data from only selected mail folders. You just need to select the folders from which you want to extract data using the provided checkboxes, as shown below -

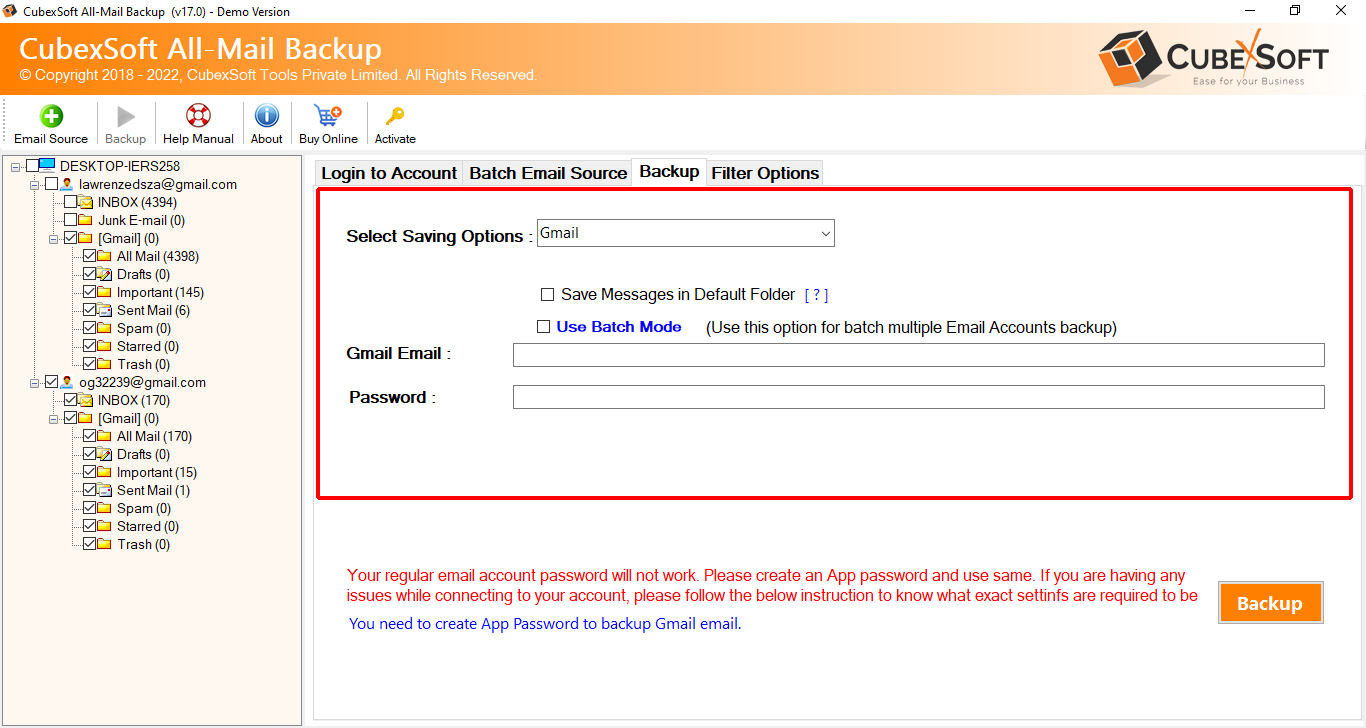
After loading the folders, the available backup options will appear on the screen.
The software provides multiple saving formats to backup emails : PST, MSG, EML, EMLx, MBOX, PDF, HTML, MHT, XPS, RTF, DOC, CSV, ZIP, OLM, Windows Live Mail, Lotus Notes, Zimbra, Thunderbird, Gmail, Outlook.com, Yahoo Mail, RediffMail, Extract Email Address, Extract Email Attachments, Office 365, Exchange Server, Hosted Exchange Server, IMAP Server, G Suite, IBM Verse, Amazon Workmail, IceWarp
Choose the right format as per your needs as shown below-

In case you have chosen PST as saving type, you will get the following sub-options -

If you have applied PDF option, then tool will show the required options. You can use them as per need and carry out the desired result -

There are lot of email apps that use MBOX fle type to store mailbox folder of user account. So, if you want to backup your emails in MBOX format, then you will get the following options -


With each saving option, the software provides various advance filters to choose from. The listed filters are -
- Date Range
- From
- To
- Subject
- Use selective export settings for mail folders
- Only export Sent Folder
- Exclude exporting email body content and attachments
Choose the appropriate filter option from the following options -


